 Think for a moment about all of most successful companies. They all have one very important common factor: vision. They're recognizable because they have a brand, a certain "look", a niche. This doesn't just hold true for mass-produced items. Think of artists for a moment- Monet was known for his particular style, which was very different from Picasso's, which was very different from Da Vinci's. When we think about all of the successful artists and companies, they set themselves apart by creating a vision, a voice- something that is markedly theirs. The questions is: How do we go about creating our unique vision in the world of handmade jewelry? Know Yourself The first step to creating your vision is to know who you are. Are you sweet? Edgy? Free-spirited? Classy? How do you describe yourself? You want your pieces to reflect who you are- all of your uniqueness. Do you favor bold, bright color schemes; or are you elegant and muted? Are your pieces over-the-top couture or sophisticated simplicity? Does your inspiration come from Nature? Literature? Old Hollywood? I would suggest to pull all of the pieces you have readily available and to lay them out together. Observe your designs thus far. Are your pieces cohesive? Would someone look at your jewelry and say "This is definitely a [insert your name here] piece"? If you have a general theme or statement, perfect you're on the right track to creating your vision. If on the other hand your pieces are all over the place and there is no particular rhyme or reason to your designs, separate the pieces you like the best and think about what it is about them that you like. Is it a color scheme, a certain style of wirework, or the way in which you strung the beads? What stories do those pieces tell? What do they make you feel? Once you know what it is that's drawing your attention to those pieces, try designing around that particular style or technique. It's important to note that this isn't about recreating the same thing over and over, but about focusing your energy on what's really "you" and allowing that to guide your design process so that your personality becomes a "stamp" of sorts on your work. If you're just getting started and you really don't know what your style is, don't let that deter you. Look at pictures of jewelry and make yourself a collage of things that catch your eye. It's very likely you'll start to see that you're drawn to a particular style and you can use your collage as inspiration for when you actually start your own designs. You can create a vision no matter where you are in your jewelry-making journey. Know Your Audience Once you know what your unique style is, it doesn't end there. You also have to consider who your audience is. This is actually a bit easier because the truth of the matter is that people tend to buy from those with whom they have something in common with. People want to buy from someone that they "get" from someone that they "vibe" with. Since by this phase you've already explored who you are as an artist and what it is that you want to portray it's simply a matter of finding other people who can understand and appreciate your style and expression. If you're a classic, romantic, Jane Austen- reading, tea party-holic who makes pearl and crystal throwback style jewelry, guess what? You should probably look for other Austen fans who will totally "get" all of your literary references and who will absolutely adore everything you make. Think of the types of places your target audience will frequent: Antique shops? Historical reenactment clubs? Bookstores? This is just an example, but these can all become possible outlets for selling your pieces either through events or consignment. Another great idea is to join Facebook groups and discussion boards where your audience is likely to be. Simply participating in occasional discussions will help you put your name out there and establish relationships. Share Your Story Story-telling is a huge part of the design process. Once you know your vision and you know your audience, it's time to tell your story. Share the inspiration behind your pieces, paint a picture of how those earrings are going to add sparkle to that first date outfit or how that statement necklace is going to turn your patron into the belle of the ball. Your story will resonate with your audience and they will be drawn to your designs not just because they're "pretty", but because they want the vision that your design has created for them.
So next time you sit down to create something, remember who you are as a designer, remember who your audience is and create a story that expresses your vision and resonates with your audience on an emotional level. They definitely will come back for more.
0 Comments
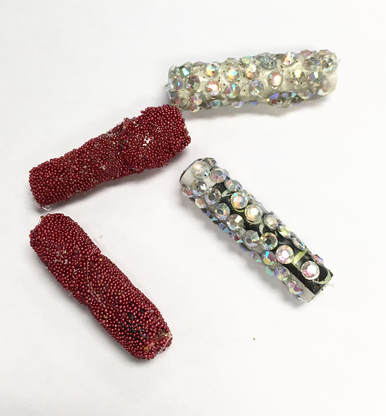 We've all been there. You have a brilliant idea in your mind for a new project and you're just so excited about getting down to work and making it happen when all of a sudden your glue doesn't adhere properly (like what happened in the picture above with my messy beads) or your stitches don't line up like they should and you're just so frustrated you want to scrap it all and walk away. Or, how about this one: You show one of your friends a bracelet or necklace that you made thinking that they're going to love it, but instead they're unimpressed, or worse- they politely feign admiration while giving you design pointers. And then there's the very concerned family member or friend who's going to advise you not to bother posting your jewelry on Etsy, or taking part in that craft fair because "there's so much competition" and "it's just not a viable source of income." These things happen and much, much more- like the time I was selling at a flea market and a lady walked up to my booth and tried to steal my customers-- right in front of me. Oh yes, the world is full of all sorts of struggles and craziness. Perhaps you feel that you're at the end of your rope. You may have been posting your designs online for weeks or months without anyone buying. You may be frustrated because you're trying to learn and want to improve your skills, but you still feel that you're not good enough. And I'm here to tell you that it's ok. It's ok to feel frustrated and to want to give up. It's ok to be sad and disappointed that things haven't worked out the way you would have liked. And I'm also going to tell you that you will run into these emotions and circumstances quite often as a jewelry designer. The important question is: are you going to give up at the first (or second, third, etc.) hiccup? So what if your friend doesn't see your vision? So what if you need to practice a little more? So what if you make a couple wonky pieces before you make a gem? Didn't Thomas Edison fail a couple thousand times before he succeeded? With this established, I will leave you with a very important concept: Success doesn't belong to those who don't fail- it belongs to those who keep going after they fail. If it really is your dream to make and sell jewelry, don't give up. Keep learning, keep designing, keep sharing your work, and whatever you do- don't give up! P.S. By the way, after making a few messy beads like the ones in the picture above, I finally made it work out and wrote my tutorial for turning ugly paper beads into beautiful ones.   We've all been there at one point or another. You're wearing your gorgeous new necklace with sparkly new beads and you're just so proud of your latest creation. You spent hours choosing the beads, designing it and lovingly stringing that necklace together and now you're so excited you finally get to show it off. So you're at a dinner with friends showing off your latest necklace when all of a sudden, you hear the dreaded sounds of glass beads bouncing off the floor. You grab your necklace only to watch the remaining beads slide off the string and go ricocheting off into the abyss. You stand horrified and embarrassed, wondering what went wrong. I'm here to tell you it's ok. Almost all of us have been there at one point in our jewelry-making adventures. If you just started and still haven't experience this horrifying experience, I'm here to show you how to avoid it. As someone who is self-taught in jewelry-making, I made quite a few mistakes in my early years. This post is a collection of lessons I learned the hard way. These are all things I wish I could go back in time and tell my novice jewelry-designer self. Don't Use Regular Thread With Crystal BeadsOne of the main reasons a necklace or bracelet will fall apart for no apparent reason is because the wrong stringing material was used. This is particularly the case if you used crystal beads or glass beads with a cotton or nylon thread. The reason this happens is because the edges of the crystal beads cut the thread little by little until it finally pops. If you're using crystal beads or glass beads, don't use cotton or nylon threads. Your best friend will be Nylon Coated Stainless Steel Wire. This wire is so strong you need to use nail clippers to cut it. It is flexible and comes in different colors as well which makes stringing even more fun. One of the most recognized brands of this type of wire is Beadalon. Another good stringing material is fishing line- but not monofilament! Stay away from plastic-y monofilament. Fireline is by far one of the best stringing materials I've used so far. It is a thermally fused fishing line which works like thread but will not fall apart if you use it to string crystals or other sharp beads. Fireline became so popular in beading circles that now it's even sold in some bead shops. This is especially good stringing material if you want to do some bead-weaving, too. Don't Use MonofilamentMonofilament is the worst type of stringing material you can possibly use. Monofilament is basically a plastic fishing line. Because it's basically made from 1 strand of plastic (it's not fused like the good fishing lines) it's very stiff and hard to work with. Besides that, it's extremely difficult to knot. Don't Use Square KnotsNever. Ever. Unless you're doing macramé- (which is a different story) don't ever use a Square Knot to finish a jewelry piece. Square knots are not a good knot for finishing a jewelry piece because they can easily loosen and fall apart, ruining your work in just seconds. One of the easiest and safest knots for finishing a bracelet or necklace is a Surgeon's Knot. It's similar to a Square Knot, but requires one additional step that secures the knot and keeps it from slipping. Besides using a Surgeon's knot, I always recommend putting a dab of glue on the knot just to be safe. Don't Buy Expensive Wire... Yet.If you're learning how to do wire-work, don't invest in silver, gold-filled or gold wire, yet. When you're seeing tutorials on wrapped loops and other wire working projects it looks easy. But it's actually not easy to master wire. Chances are you will have a lot of lopsided, wonky pieces before you create some beautiful wire work, and you really don't want to be messing up if you're using silver or gold wire. The best way to practice your wrapped loops and other wire working techniques is to purchase copper wire and practice with that. Copper wire is one of the most inexpensive wires and you can even find it in a lot of fun colors to make your practice time more fun. Practice really does make perfect and it's going to take a while before you can form perfectly wrapped loops and get your wire working skills on point. Don't Use Your Wire Cutters On Memory WireI ruined a perfectly good pair of jewelry making wire cutters in my early days trying to cut a piece of memory wire. If you haven't come across memory wire yet, it's a wonderful wire for making bracelets and chokers because it doesn't loose it's shape. Better yet, to finish the piece you just need to make a loop at the end and you're done. No special finishing techniques required. The important thing to remember about memory wire is that you can't cut memory wire with regular cutters. It's so strong it will actually damage your wire cutters. If you're using memory wire, use memory wire cutters. Don't have memory wire cutters? Try this simple technique to cut it: Bend the memory wire back and forth where you want to cut it until it breaks off at that point. It's a little more work, but it will get the job done. Don't Use Hardware Pliers To Make JewelryThis is another common jewelry making mistake. When I first started, I would get very frustrated when I was making jewelry because I'd end up with really ugly wrapped loops and wire work. My mistake was that I was using hardware pliers to make jewelry, not jewelry making pliers. There is such a huge difference between hardware pliers and jewelry making pliers! For one, hardware pliers typically have ridges which actually imprint on the wire when you're working with it. The result is that you end up with unwanted texturing on your wire (instead of a nice smooth surface). Besides the rough surface on hardware pliers, they are extremely uncomfortable to use for extended periods of time. I recommend purchasing a set of ergonomic jewelry making pliers. This will make your life so much easier if you're just starting out. You won't have to worry about ridges or marks showing on your wire and your hands won't hurt from using them. Don't Give UpLearning to make jewelry is not going to be easy. You'll eventually make mistakes or finish a project that you're less than happy with. Don't let that stop you. Every malformed loop is going to bring you closer to a perfectly shaped loop. Every project that comes out so-so is going to bring you closer to reaching expertise. Keep going, it'll be worth it!
 One of my favorite things to recycle are old calendars. If you think about it: they're full of vibrant color and beautiful photography... so why not take advantage??? I've made a lot of projects from these so here are just a few ideas of what you can do with an old calendar! You can make stickers from your old calendarsThere are many ways to turn your old calendars into stickers. The easiest way is to use a shape punch and then run the shape through a sticker machine. I made the circle stickers in the picture below using a circle punch and then I used my Xyron sticker machine to turn them into stickers. You don't need a sticker machine to make the stickers, but it's certainly fun to use and it's one of my favorite craft tools. If you don't have a sticker machine, you can easily turn them into stickers by using double-sided tape. 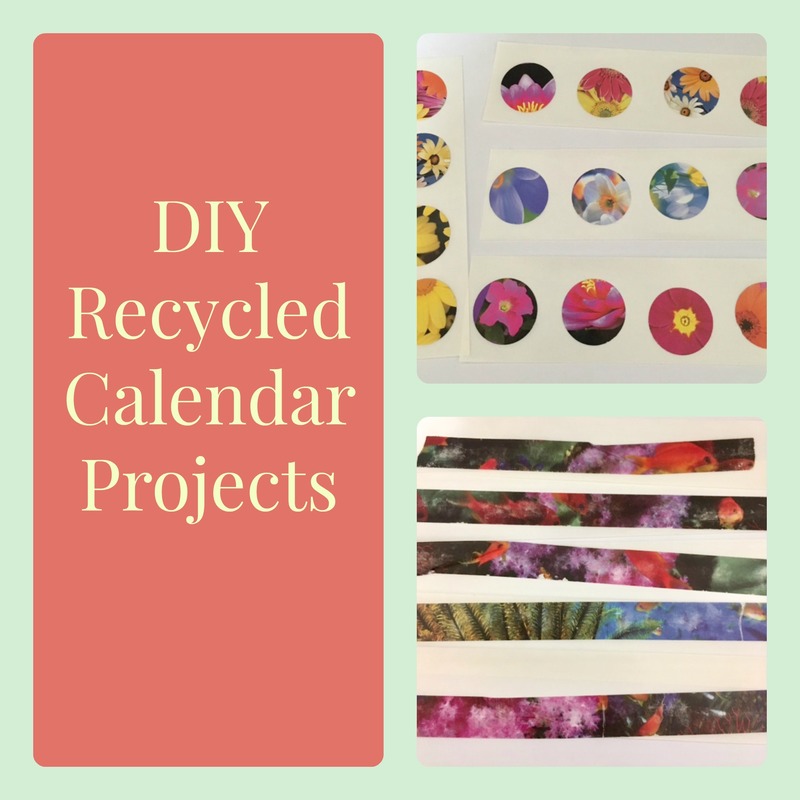 Another cute idea for making stickers is using layering to get a more dimensional look. I used punches for my daisy and butterfly stickers and simply combined two layers to give them a fuller look. These were super fun and easy to make and you can embellish them to your liking. If you don't have punches, you can always cut out shapes using scissors. I prefer punches for their ease of use and because they're quick, but you can also draw or print templates from cardstock and use those to trace and cut out shapes. I didn't run these through the sticker machine, I prefer double sided tape or pop dots to turn these into stickers. If you use pop dots, you get a very cool 3D effect. 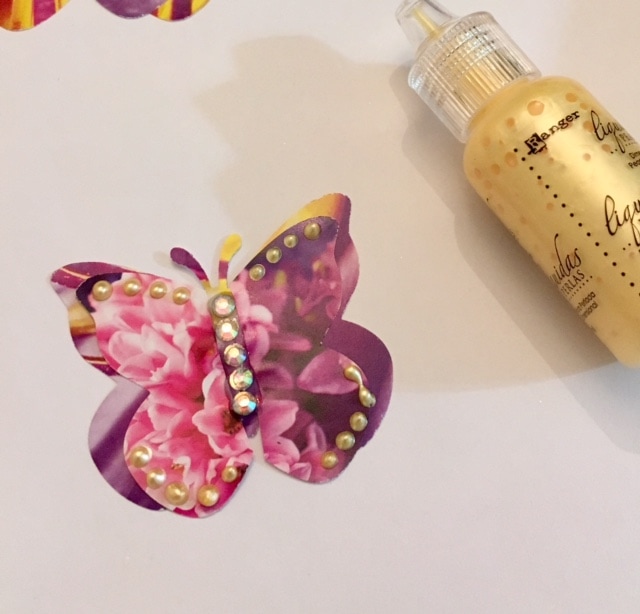 You can make image transfers from your calendarsCalendars also make great image transfers because of their pigments and bright colors. Image transfers are so easy and rewarding to make you're going to want to make lots of them! You can use image transfers for decoupage, stickers, and for jewelry-making. 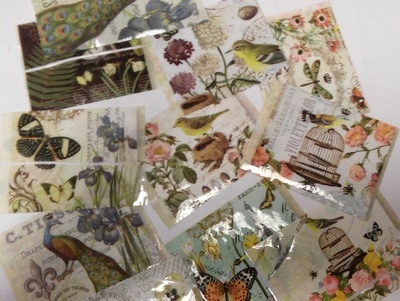 You can make paper beads from your calendarsPaper beads are another fun and rewarding project you can make from old calendars. You simply cut the calendar page into strips and roll the strips using either a toothpick or paper bead roller to form the bead. You adhere the end of the strip and then glaze the beads so that they're sealed. Paper beads can also be decorated and embellished. You can use old calendars to make greeting cards and cool envelopesYou can cut out images from old calendars and make a decoupage greeting card or you can also fold a calendar page into an envelope for your letters and cards. What are your ideas for recycling old calendars?There are so many things you can do to recycle old calendars. These are just a few of the things you can make with them. I'm sure that as I continue creating that I'll find other creative ways to recycle old calendars. Feel free to share any ideas in the comments! I would love to see them!!! Happy Crafting!!!
Tools and Materials for you Success A few days ago I discussed several things you can salvage from your garbage and recycling bins that make great materials for up-cycling projects. Aside from collecting these items (like clear plastic containers and cardstock from product packaging) there are certain tools and materials that I highly recommend for your journey into making jewelry.
I would say the most important set of tools for anyone who wants to make jewelry is a good set of jewelry-making pliers. Many years ago when I first started learning to make jewelry I started with some household pliers because I didn't know the importance of having good tools. Needless to say, the household pliers were difficult to work with and they even left ridges on my wire. When I finally purchased a set of pliers specifically for making jewelry, I was surprised by how easy and effortless it really was. One of the things I look for when I buy pliers are an ergonomic grip. If you love making jewelry as much as I do, you will be using those pliers quite a bit so invest in pliers that will not make your hands hurt. I would also look for a kit with different types of pliers. Make sure it comes with round, flat and bent nose pliers as well as wire cutters. Usually you will save money if you buy the set versus purchasing them separately Another product I am very fond of and recommend to everyone is a small hole punch. It's just like a typical hole punch, but the hole is a lot smaller so it is perfect for turning your recycled pieces into pendants, earrings and other jewelry components. Besides these tools, I also have some materials that I keep using over and over because they are so good. One of my absolute favorites is Ranger's Inkssentials Glossy Accents. Throughout the years I've bought many types of glazes and top coats for my craft projects, but I'm completely in love with this brand. It creates a highly shiny top coat without being sticky and it almost looks like a resin coating. The applicator tip is also very precise so you don't even need to use a brush with this product. Lastly, you will also need some jewelry making basics like wire, chain, headpins, eye pins, jump rings, clasps, earring wires and some beads. A lot of these materials can be purchased in a combined kit and I recommend that for beginners, this way you can begin your jewelry-making without breaking the bank. Have you been making jewelry for long? What are some tools and materials you can't live without? Let me know in the comments below! Finding Materials & Storing Them
Starting any hobby usually requires a small investment up front. Fortunately, making recycled jewelry is an inexpensive hobby that can actually save you money in the long run and you only need minimal tools and materials to get started. The best part of making jewelry from recycled materials is that most of your materials will be free and they're very easy to find. I will be doing a series of posts on how to get started. In this first post, I'm covering where to find things you can recycle into jewelry and how to store them.
In my journey making jewelry from recycled objects I've developed an eye for things that make great jewelry components. You would be surprised at what you can do with an empty hummus container or yesterday's newspaper. My favorite materials are cereal boxes, plastic food containers, plastic bottles, junk mail, magazines, catalogs and old calendars. As you start making jewelry from recycled objects, you'll develop a sense of what makes good material for your projects. You may even find that some things (like tissue boxes) already come with really pretty colors and designs. Take advantage of all the effort companies put into their product packaging. So many items already have beautiful colors and pictures that you can use in your projects that you won't have to do too much to have an interesting outcome. With all of those materials, I know the question is going to arise as to how to store them. I keep my materials sorted based on size and composition. When I find a good plastic container for upcycling, I wash it, remove the labels and cut it into squares or sheets so that I can then store the pieces in a box for when I'm actually ready to do something with them. This helps me stay organized because I don't have tons of empty containers in my crafting space and it's also nice because when I'm ready to make something I can go straight to the fun part and skip the initial prepping. For cardstock items, like nice tissue boxes, I flatten them out and store them in a scrap booking container. If I plan to use them for image transfers, I'll usually make the image transfer right away so that it doesn't take up as much space. Since image transfers are thin, you can store them in a smaller container and keep them stored until you're ready to use them. This also helps save time because the process of making an image transfer can sometimes be a little lengthy (especially if you have stubborn paper that doesn't rub off easily). Making your image transfers ahead of time and storing them will make it so much easier when you want to use them. Other things that you may want to collect are things like small bits of ribbons, buttons and old jewelry. I usually store these types of materials in jars or a small container. This of course depends on the amount of materials you have. If you have hundreds of buttons, then a container with a lot of compartments is probably your best bet (like a bead organizer). Also if you have a lot of old jewelry for recycling, I would suggest a bead organizer. You can clean and take apart the jewelry and separate all of the beads and components to make it easier to use once you're ready to make jewelry. Again, prepping and organizing will make things easier so that when you're ready to sit down to make your recycled jewelry you can get right to the creative process and skip all of the sorting, cleaning and prepping.
|
AuthorHi! Thank you for stopping by, I'm Diana. I love making jewelry, reading (especially the Bible) journaling, writing, saving money, and sharing everything I know with other people! Archives
October 2017
Categories |
 RSS Feed
